First Step:
|
First you shall configure the Valve Hammer Editor. I am gonna mention only the basic. First run the hammer then go to tools>options. A configuration window will pop out, 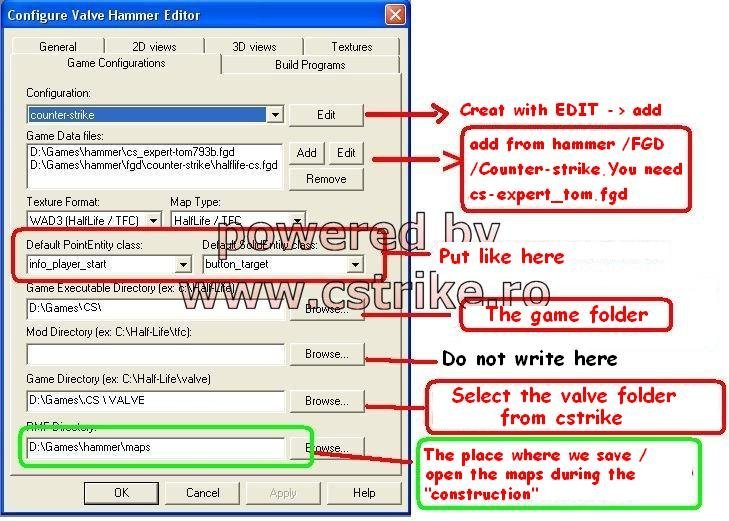
You must set the config. just as above depending on your game directory.To work on hammer you will need the Game Data File You must start with the halflife_cs.fgd. Found in exmp: C:\Valve\cstrike\halflife_cs.fgd. At the Game Executable directory, browse to cs.exe your application. Set the Game Executable directory (Halflife\valve) as shown above. And the RMF Directory, browse to your map folder in C:\Valve\cstrike\maps. Lets go to textures shall we. Click on the textures tab above. You will find the add and remove buttons. Click on add try to find halflife.wad try downloading, google it. Add and it will be found in the list. Thats all to know about the textures. Now to the Build Program. Click on the Build Program tab. Now A screen as the following will appear. 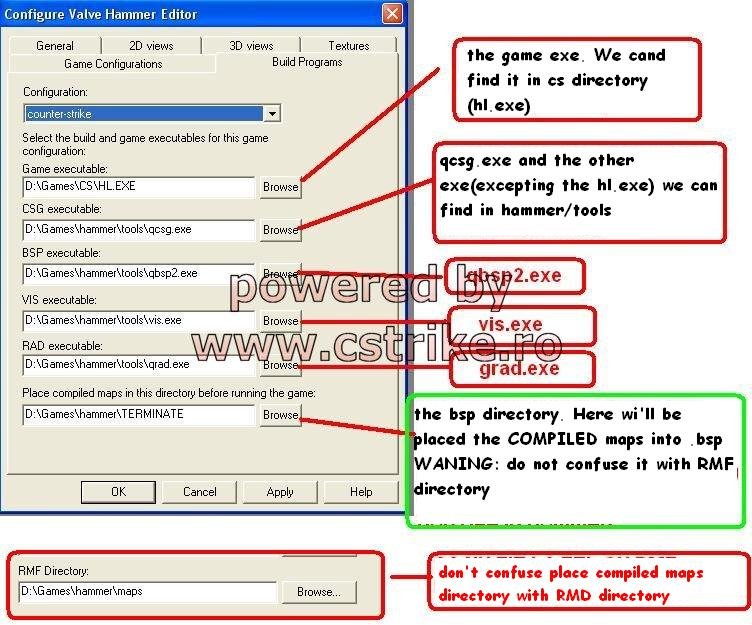 Lets make this quick. When download the hammer editor a couple (4) of exe files come along. BSP,RAD,VIS,CSG. So what you have to do is browse and place in the requested space. Example: bsp executable. Browse for bsp.exe and choose it. RAD Executable, browse for RAD.exe and choose it.etc. And about compiled maps directory i usually browse for the map directory. For the Game Executable browse for HL/CS.exe. Thats all for now. Ignore the 3D and 2D View. Ok lets map. First click on File>new. A 4 coordinated plane windows will appear,each represting coordinates. 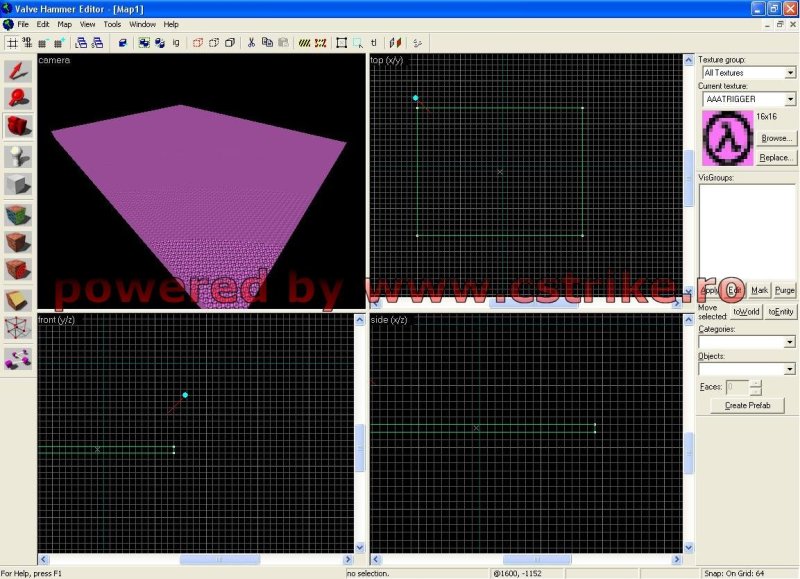
So lets try to make a block as shown above. First choose your texture for the block. It is randomly set to AATRIGGER. Eww. Its so ugly change to anything you want.(click on browse to search for textures). As soon as you choose you textur, go to the TOP VIEW(coordinate x,y) It shows the block from above. Form a square, then you can adjust its height from the SIDE- VIEW(coordinate x,z). If you want to make a floor adjust the height of the block to be flat. You can determine the how the 4 windows work from their name TOP,SIDE,FRONT,3D. In the 3D view use your W,S,A,D keys to move or the mouse. Oh! almost forget, sorry but I seem to skip the explanation of the tools. Anyway here goes. First is the selection tool: It allows you to select blocks/brushes or entities(explained later) Zooming tool: Allows zooming in and out in a the views. Camera Tool: Allows you to move in the 3D View. Entity Tool: Allows you to create players,effects,light,rain,cars etc. Block Tool: The most important tool ever, you create brushes(roof,floor,wall). Texture Tool: Allows you to apply a textur to a selected brush. Not Important Apply Decal Tool: Apply to decals,pictures. or textures to a selected brush. Cliping tools: Cuts walls or brushes to give a new shape.(roofs,angled walls) Not Important. That does it for the explanition. So just create blocks, raise them up to create walls. Same for the floors but with no height. And create triangular roofs using clipping tool.
How to run your map you ask. Well lets make sure you have the needed entities first. Select the entity tool. Under Categori es and Primitive you have a whole list to selectm go and select info_player_start, this will determine the spawn location of a single counter-terrorist. So dont forget add more. (If you want to spawn terrorist go to info_player_deathmatch) When you want to place and entity in a coordinated plane it will appear as a hammer, click any where on the map you will notice that it will change in to a green square. After you chose a place, hit enter. The entity now shall appear in the 3D View as a green rectangul, make sure it is above your floor otherwise it will be stuck or if it was outside your map your player will fall to eternity(This is very Important). Now lets add light to our map, while in the entity tool select info_light Place anywhere inside the map(I recommend to raise it up a bit) It is vital to place lights otherwise the map will be dark. Now lets create a sky! In the texture tab go to browse, type in the filter Sky. Depending on the WAD Files you use, the sky might increase in results. You might find one texture appears. Select it and draw a cube around your map. 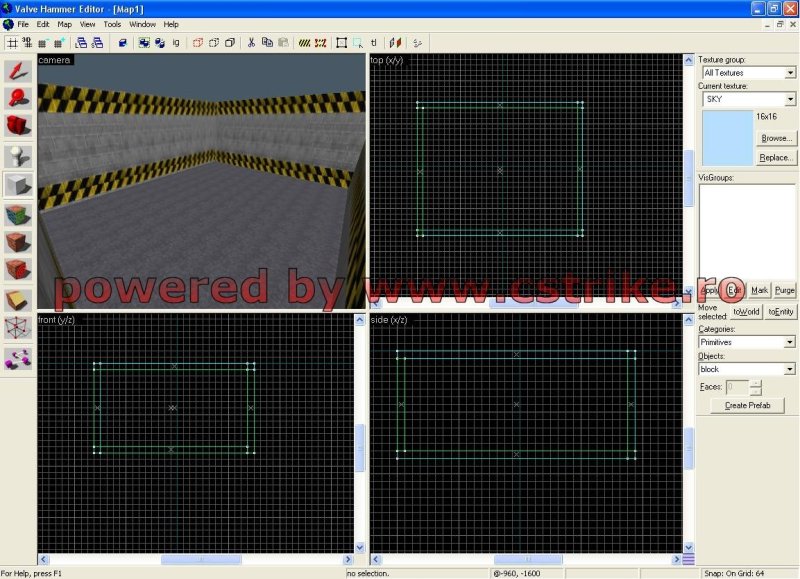 Great! Now that were are done. Lets run the map. Press F9. A window will pop out as below 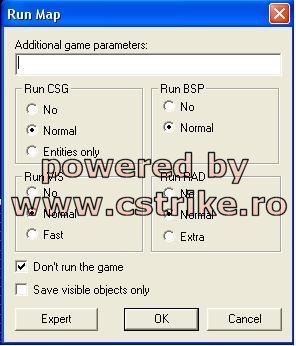 Tick everything as shown above. It is extremely important to check RUN BSP. This will create the map files and its component. No BSP No Map. Check Run RAD and CSG too. But I dont recommend Running the VIS. Make sure all are set to normal.. Check Dont Run The Game and press ok. A compile Window will appear dont click anything until it finishes or it will ruin everything. Thats all you created your first map! Now lets reveiw. DONT EVER FORGET TO PLACE LIGHTS. PLACING Player Starts Are important to run the map, if not done the map wont be found. Save your map from time to time. To avoid data loss. Place Skyboxes to avoid leaks and give your map a pleasant view. For more clear tutorials visit youtube and search for hammer tutorials. |